[Prologue]
First of all, let me explain to you why I needed to make this PSE Control Unit and decided to provide it as a Complete DIY Kit.
In May 2015, I imported the Porsche Sport Exhaust System (PSE) and tried to retrofit it to my Porsche 911 Carrea S (Type 997.2).
And I planned to control the PSE with the Combined Switch on the center console, as if it were a genuine Porsche option.
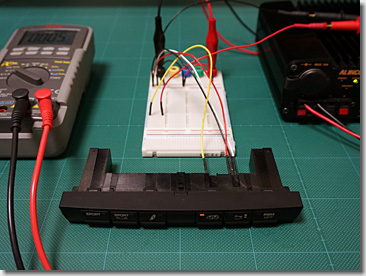
To realize this idea, I analyzed the internal connection of the Combined Switch and designed a small circuit.
Since it is an expensive car, reliability and durability are very important, so I made an original printed circuit board (PCB).
This PCB became the prototype of this PSE Control Unit.
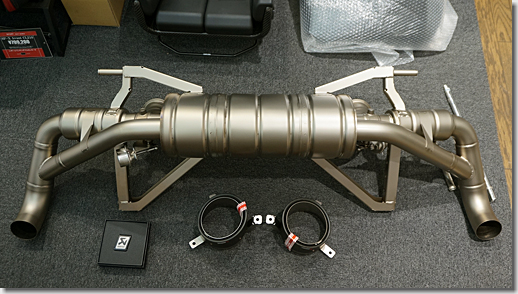
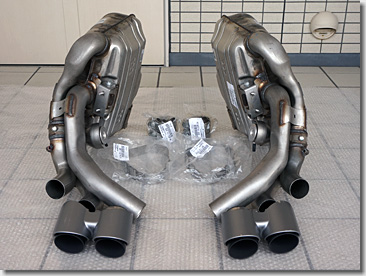
In February 2019, I purchased the Akrapovic Slip-On Line Titanium Exhaust System and retrofitted it to my Audi R8 V10 5.2L quattro.
Just as I made the circuit for Porsche, I designed the circuit for Audi that can control the Electromagnetic Valve from the driver's seat.
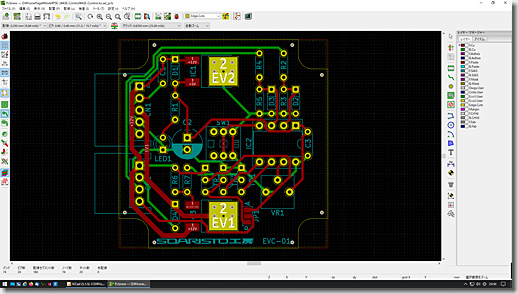
To further increase reliability and durability, I designed the PCB in the same way as other mass-produced products.
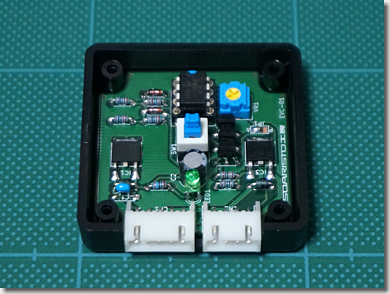
And I outsourced manufacturing of the PCB to a Japanese company, not cheap and shoddy Chinese. 0xF9F8
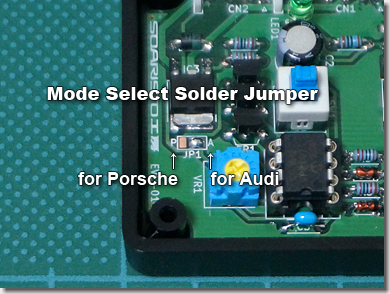
This PCB is devised so that it can be selected between for Porsche and for Audi depending on the position of the solder jumper.
When I published this PSE Control Unit on my homepage, there were many requests from overseas Porsche owners, so I decided to provide it as a Complete DIY Kit.
I hope this Complete DIY Kit will be useful and pleased for overseas Porsche owners. 0xF995
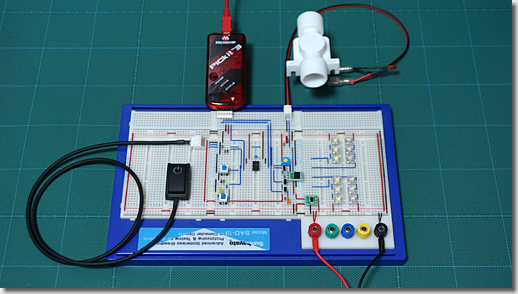
How the PSE Control Unit works, see this video clip.
(This movie is the prototype version.)
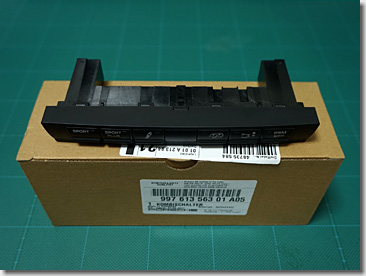
[Confirmation of Contents]
When you receive the package that I send, check the contents.
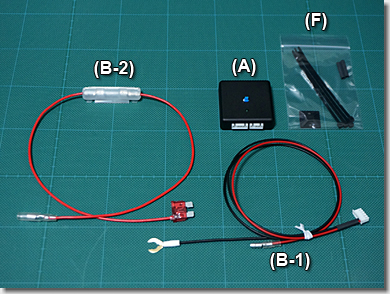
| (A) | PSE Control Unit (Body) |
| (B-1) | Wire Harness for Power Supply |
| (B-2) | Wire Harness for Power Supply (with "Convenient Fuse") |
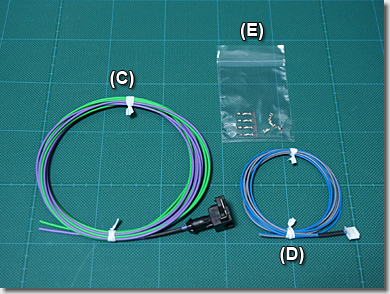
| (C) | Wire Harness for Electromagnetic Valve (with Bosch Connector) |
| (D) | Wire Harness for Combined Switch |
| (E) | Connector Contact Pins |
| (F) | Tie-Wraps, Heat Shrink Tubes, etc. |
[Preparation of Tools]
Before the installation work, prepare some tools.
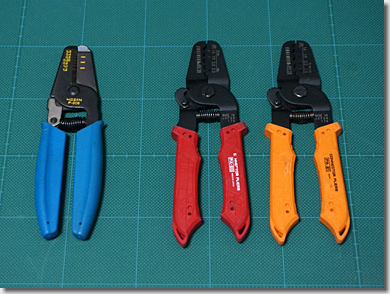
On the left side is a Wire Stripper. Used to strip the coating of the wire. It is Hozan P-906 (New P-960).
On the right side is a Connector Crimping Pliers. Used to crimp the connector contact pins. These are ENGINEER PA-20 / PA-21.
Both tools are made by a Japanese company, not cheap and shoddy Chinese. 0xF9F8
How to use both tools, see this video clip.
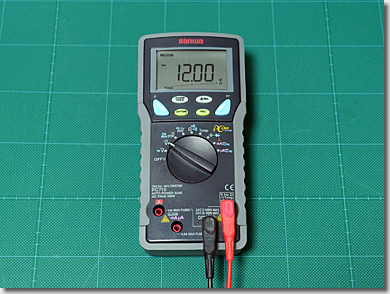
This is a Electronic Tester (Digital Multimeter). Used to search the power supply in the fuse box.
It is Sanwa PC710, it can transfer the measurement data to the PC by USB connection.
Of course, it is made by a Japanese company, not cheap and shoddy Chinese. 0xF9F8
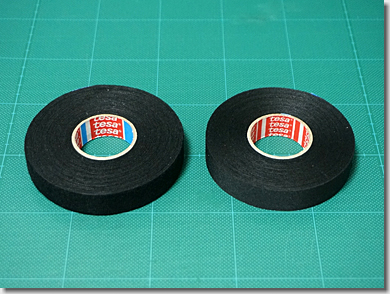
On the left side is a Fleece Sleeve Tape for wire harness in the automotive passenger compartment. It is tesa Sleeve 51608.
On the right side is a Cloth Sleeve Tape for wire harness in the automotive engine compartment. It is tesa Sleeve 51036.
tesa is a German company whose products are often used in German cars such as Porsche, Audi, etc.
These are very useful for damping noise and protecting from abrasion.
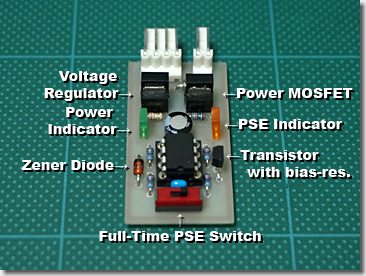
[Wiring Diagram of PSE Control Unit]
Before the installation work, imagine the overall configuration of the wiring.
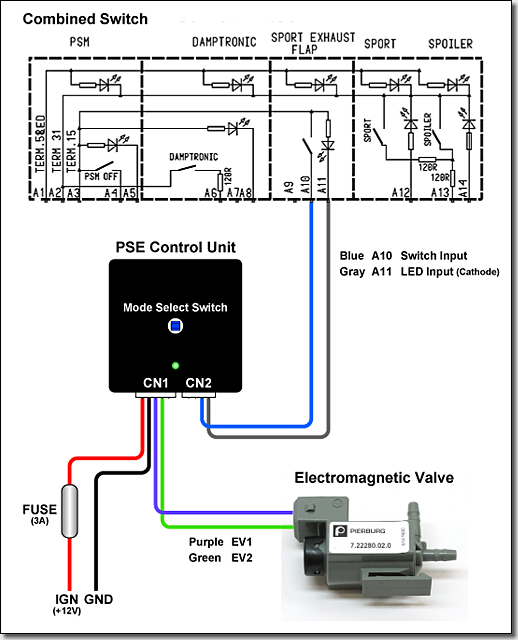
The wiring diagram of the PSE Control Unit is as above. It is not so difficult and complicated.
| Pin | Color | Symbol | Signal Meaning | |
| CN1 | 1 | Red | IGN | Power Supply (Ignition) |
| 2 | Black | GND | Ground (Earth) | |
| 3 | Purple | EV1 | Electromagnetic Valve + | |
| 4 | Green | EV2 | Electromagnetic Valve - | |
| 5 | - | NC | Not Contact (Only use for Audi) | |
| CN2 | 1 | - | NC | Not Contact (Only use for Audi) |
| 2 | - | NC | Not Contact (Only use for Audi) | |
| 3 | Blue | SW | Switch Input (from Combined Switch) | |
| 4 | Gray | LED | LED Input (from Combined Switch) |
[Installation Work]
Now, let's start the installation work.
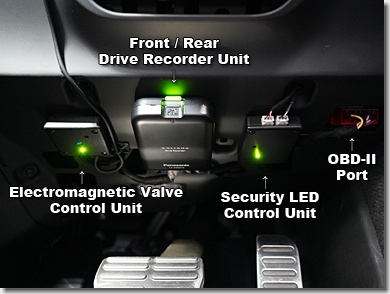
(i) Pull the EV Wire Harness and Fix the Control Unit
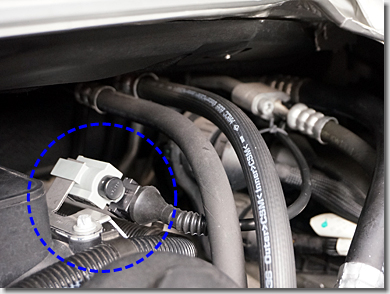
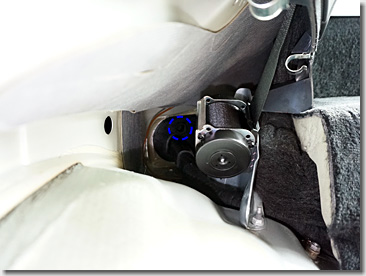
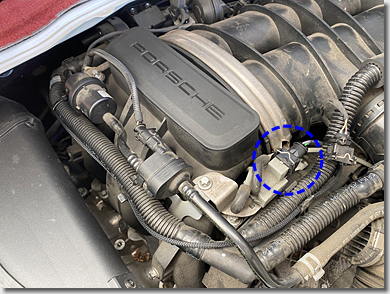
This is a genuine Porsche Electromagnetic (Solenoid) Valve. (This position is a case of Type 997.2.)
It controls the Butterfly Valve in the middle of the Exhaust Pipe, like this.
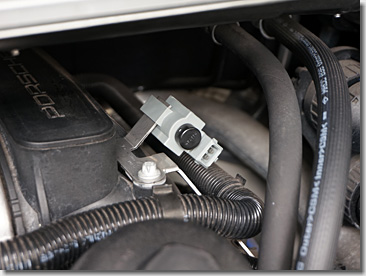
Disconnect the genuine Porsche Waterproof Coupler (Connector) from the Electromagnetic Valve, and connect the Waterproof Coupler of the Wire Harness (C).
This Waterproof Coupler (and also genuine Porsche one) is Bosch OEM connector. So, it is easy to swap them.
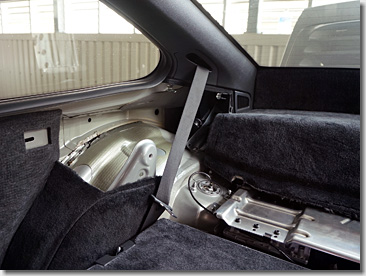
Remove the rear sear and the rear side lining.
This is a Rubber Grommet on the bulkhead that separates the passenger compartment and the engine compartment.
There is a Service Hole at the Rubber Grommet.
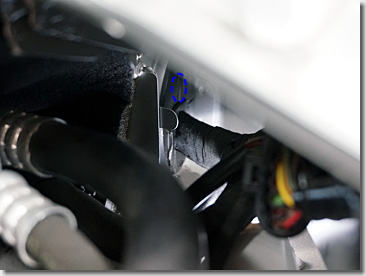
This is the Rubber Grommet seen from the engine compartment.
Make a small cross-shaped notch at the Service Hole using a cutter.
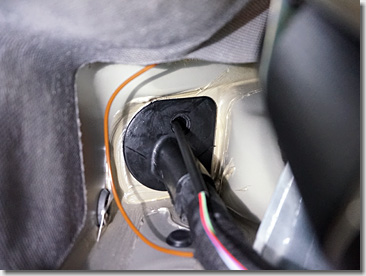
Pull the Wire Harness (C) from the engine compartment through the notch.

Fix the Wire Harness (C) along the body shape using a Sleeve Tape.
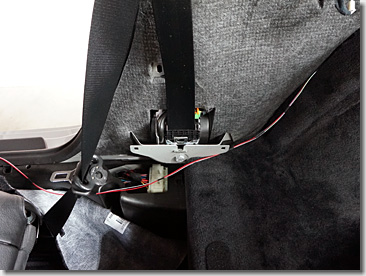
At the base of the B-pillar, there is a genuine wire harness junction box.
From this junction box, fix the Wire Harness (C) along the genuine wire harness using a Sleeve Tape or Tie-Wraps.
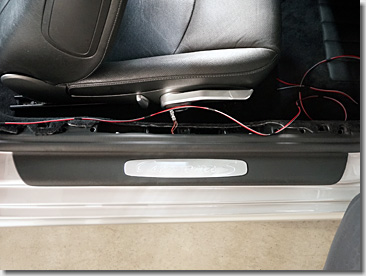
At the side sill, also fix the Wire Harness (C) along the genuine wire harness using a Sleeve Tape or Tie-Wraps.
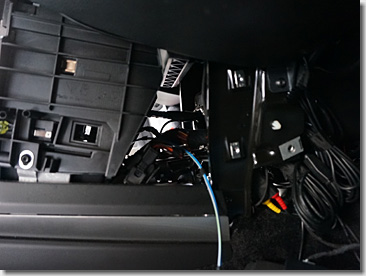
Pull the Wire Harness (C) to the base of the A-pillar. (This position is a case of right handle model.)
It is only a few meters, but it is been a long way, indeed. 0xF9C5
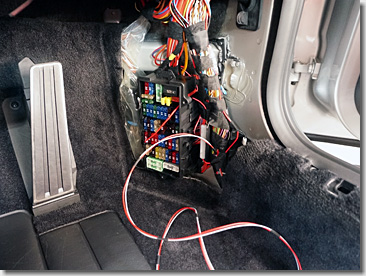
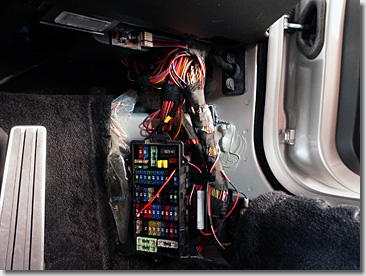
Open the lid of the fuse box at the base of the A-pillar.
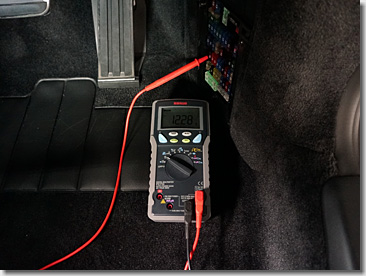
Search a position where the fuse is not inserted and the power supply can be taken out using a electronic tester.
It should become OFF when the engine is not running, and it should become ON when it is running. So, it is not a Battery Power, but is an Ignition Signal or an Accessory Signal.
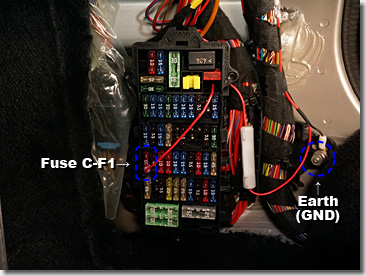
In a case of my 911 Carrera S (Type 997.2), the position is C-F1 (Red, 10A).
Insert the "Convenient Fuse" of the Wire Harness (B-2) to the position.
Pay attention to the insertion direction of the fuse. If it is inserted in the opposite direction, the power supply will pass through the fuse twice (10A and 3A).
Connect the spade terminal of the Wire Harness (B-1) to the earth point (GND).
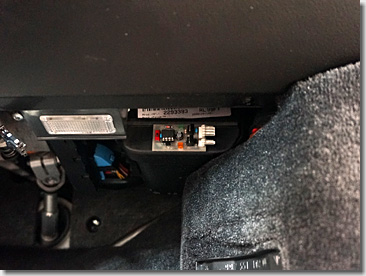
Fix the PSE Control Unit Body (A) to your favorite position using a double-sided adhesive tape.
(This photo is the prototype version. Now I do not own 911 Carrera S (Type 997.2). So, I have no photo of the product version.)
(ii) Pull the Switch Wire Harness and Terminate the Control Unit
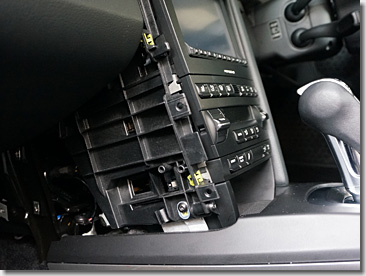
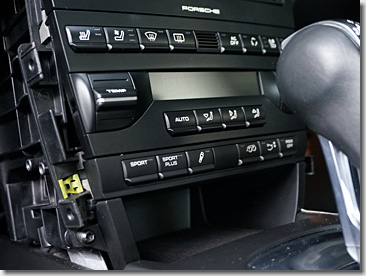
Remove the left and right side panels of the center console.
The Combined Switch is fixed to the console frame with a metal spring. These are on both left and right sides.
Push in the metal spring and pull out the Combined Switch.
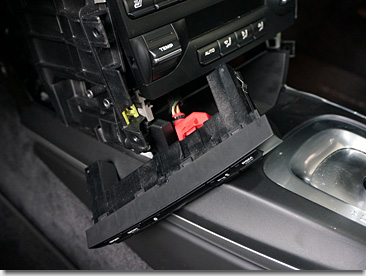
Remove the Combined Switch.
Pay attention not to scratch the Center Panel when pulling it out.
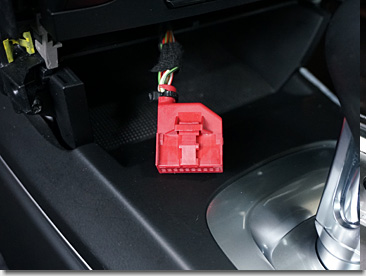
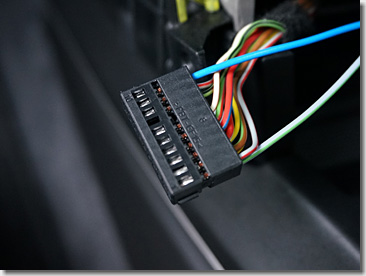
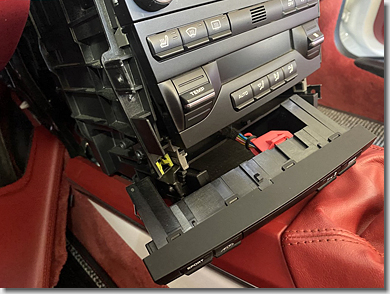
This is a connector of the Combined Switch.
Cut a small Tie-Wrap using a cutter and slide the red connector cover to remove it.
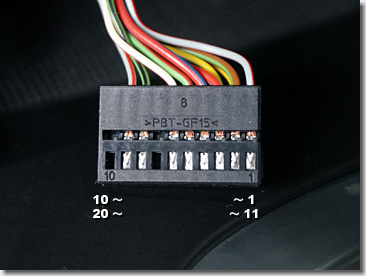
This is the inner part of the connector. There are 20 pins in total.
The pin number is written on the side of the connector.
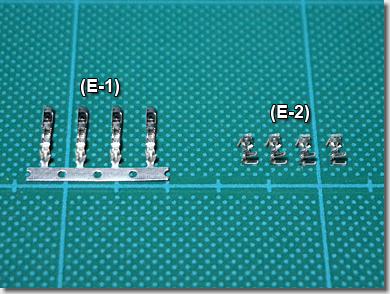
On the left side is the Contact Pins (E-1) for the wire harness of the Combined Switch.
It is made by TE Connectivity (former company name; AMP) whose products are often used in German cars such as Porsche, Audi, etc.
On the right side is the Contact Pins (E-2) for the wire harness of the PSE Control Unit.
It is made by JST (Japan Solderless Terminal).
There are four pins each, but only two pins are used. The other two pins are spares when you fail to crimp. 0xF9CE
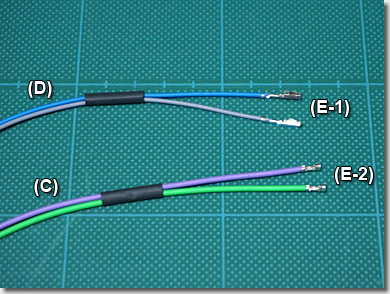
Crimp the Contact Pins (E-1) to Blue and Gray wire of the Wire Harness (D) using a Wire Stripper and a Connector Crimping Plier.
The Blue and Gray wire are 0.3sq (AWG22).
And crimp the Contact Pins (E-2) to Purple and Green wire of the Wire Harness (C).
The Purple and Green wire are 0.5sq (AWG20).
Before crimping the contact pins, adjust the length of the wire harnesses from the PSE Control Unit and from the Electromagnetic Valve.
If it is too long, cut it. But it needs a reasonable excess length for the termination.
Insert the Blue wire to the Connector Slot A10 of the Combined Switch.
And insert the gray wire to the Connector Slot A11.
When insert the wire all the way, the contact pin makes a small clicking sound.
Do not make a mistake. If so, it will cause serious damage to the PSE Control Unit and the Combined Switch.

Fix the Wire Harness (D) along the genuine wire harness using a Sleeve Tape or Tie-Wraps.
Insert the Combined Switch to the console frame as before.
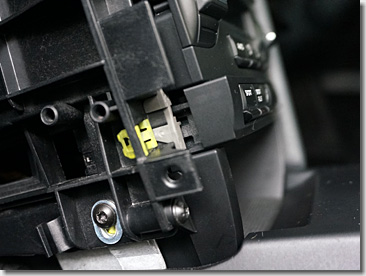
Pull the Wire Harness (D) from the console frame.
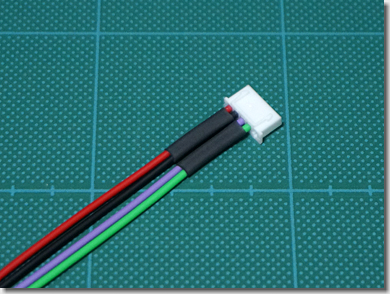
Insert the Purple wire of the Wire Harness (C) to the Connector Slot 3.
And insert the Green wire of the Wire Harness (C) to the Connector Slot 4.
(Even if you insert them in reverse, there is no problem. But do not insert them to the Connector Slot 5. It is used only for Audi.)
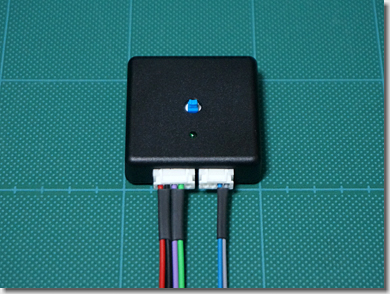
Connent the Wire Harness (C) and the Wire Harness (D) to the PSE Control Unit Body (A).
(This photo is on the desk, but it is actually on the car.)
(Do not insert anything to the Connector Slot 1 and 2 of the Wire Harness (D). These are used only for Audi.)
Fix the Wire Harness (C) and the Wire Harness (D) along the genuine wire harness, and terminate these wires with a reasonable excess length using a Sleeve Tape or Tie-Wraps.
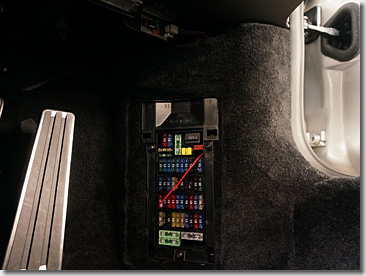
Fix the front side lining and close the lid of the fuse box as before.
(iii) Check the Operation of the Control Unit
Check if the PSE Control Unit is operating correctly.
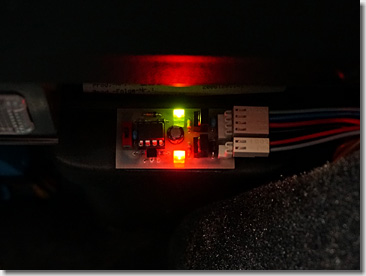
Before inserting the car key into the key cylinder, the Green LED Lamp in the center of the PSE Control Unit is OFF.
Insert the car key into the key cylinder, the Green LED Lamp should be ON.
It becomes the Accessory State, and the power is supplied to the PSE Control Unit.
(This photo is the prototype version. I have no photo of the product version. In the product version, there is no Orange LED Lamp.)
(This photo is a case of my Audi R8 V10 5.2L quattro.)
Turn the key once, the engine starts.
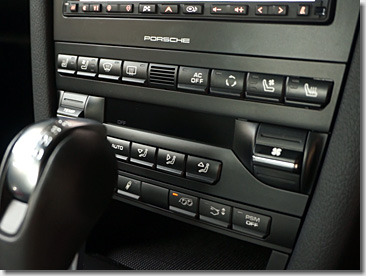
Push the PSE button of the Combined Switch. The Orange LED Lamp on the button lights up, and the sound notes of the exhaust should change.
Push the PSE button once more. The Orange LED Lamp goes out, and the sound of the exhaust should be quiet.
The button operates alternatively.
Then, turn the key off.
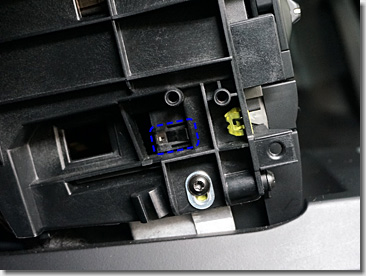
Push the Blue Switch in the center of the PSE Control Unit, it is held in a low position. The PSE Control Unit becomes "Always-ON Mode".
Insert the car key into the key cylinder, the Orange LED Lamp will blink shortly to tell you that it is in "Always-ON Mode", like this.
Therefore, the PSE will be turned on before the engine starts.
Even it is in "Always-ON Mode", you can turn off the PSE at any time by pushing the PSE button.
The button also operates alternatively.
Congratulations! You made it! Enjoy the sound notes of the exhaust! 0xF9CF
Thanks, Arigato.
[Epilogue 1]
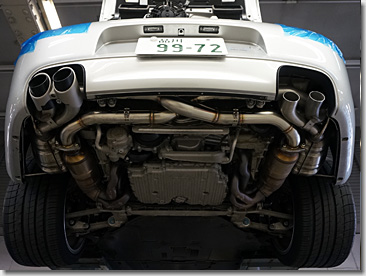
I installed the Original (One-Off) Straight X-Pipe instead of the genuine Porsche center exhaust.
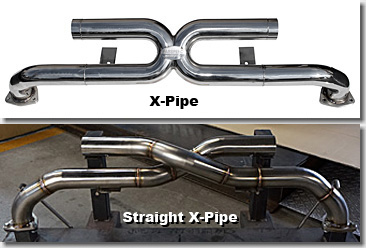
As you can see, the difference between a general X-Pipe and the Original Straight X-Pipe. The latter has less exhaust gas resistance.
About the Original Straight X-Pipe, refer this page. (Although it is written in Japanese.)
[Epilogue 2]
I am a businessman on weekdays, but I become a Sunday Engineer on weekends. 0xF995

I procured many electronic devices in Akihabara, Technopolis Tokyo, Japan.
At night, it looks like the opening scene of "BLADE RUNNER", doesn't it? 0xF9F8
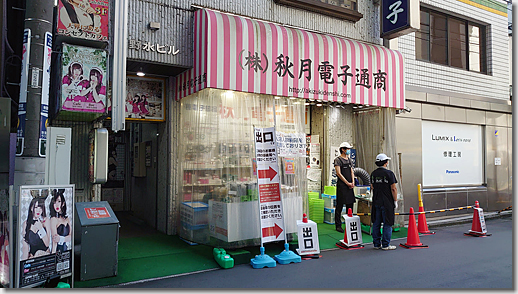
This is one of the famous electronic device retailers in Akihabara.
It is in a multi-tenant building with some kind of suggestive store, Anime Otaku / Cosplay.
I am one of the serious and hard-working Japanese business people, so I will not enter such a store. 0xF9CD
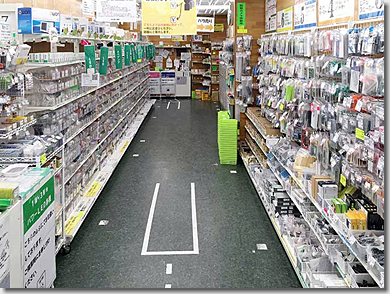
There are so many many devices in it.
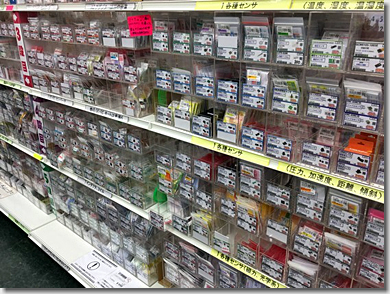
If you can not find the device there, you will not find it anywhere else.
When you come to Japan, visit Akihabara. You can experience the Japanese subculture. 0xF9CE
[Additional Information]
A Rennlist Member named "will007" successfully installed this Complete DIY Kit to his Boxster Spyder (Type 987.2) and kindly reviewed it in a thread.
This is the position of Boxster's Electromagnetic (Solenoid) Valve.
Boxster and Cayman (Type 987.2) also use the same Combined Switch as the Carrera series.
More detailed installation instructions written in English, refer this post.
| 10 Related Entries | |
 耕運機サウンドの追求(8) - 本体取付っ!! | Next  「部品買うのもヘンタイ → タイヘンだよ」の巻 - 秋月電子通商 |
 SOARISTO at 11:44:22
|
Comments(6)
|
Trackback(0)
SOARISTO at 11:44:22
|
Comments(6)
|
Trackback(0)Link URL: https://www.soaristo.org/blog/archives/2020/11/201121.php
PSEコントロールユニットの取り付け方法(ポルシェタイプ997.2 / 987.2)についてのお問合せです。
はじめまして。
お問合せさせていただきます。
当方も可変バルブを純正スイッチで操作しようと考えており、当ブログを拝見しました。そこで、教えて頂きたいのですが、この基盤は、販売されておりますか?
もし販売しているなら、価格などを教えて頂くことは可能でしょうか?
お手数をお掛けしますが、ご連絡頂ければ幸いです。
997さん
返信遅くなりました。
海外の何人かのPorsche乗りに提供したため、あいにく手持ちがありません。
しばらくお時間をいただければ、お分けすることは可能です。
なお、「基盤」は「基板」ですし、「おられる」は謙譲語であって、他者の動作に使うのは不適です。あえて言うなら「販売していらっしゃいますか」かと。
Hello
Im installing an aftermarket remote operated valved exhaust on my 997.2 4S and wondering if I can use this circuit to control this valved exhaust via the OEM PSE dashboard switch?
I do not have PSE but was thinking about buying the switch and seeing if I can operate the exhaust remote valve via there.
Even if it is not PSE, this kit can control the valved exhaust. It is proof that it can control both Porsche 911 and Audi R8.
For DIY installation, you need electrical circuit knowledge and skills.
I am looking to purchase the PSE kit for my Cayman 987,2 how can I buy this from you?
Hi, what a great mod!
Where can I buy the kit?
I have a Porsche Macan Turbo (2014) with No PSE.
But I have an after market exhaust with vacuum valves.
I am thinking about buying the PSE button and make it work with your kit.
I hope too hear soon.
Thanks in advance!